

WordPress is an open source publishing platform. Its development started in 2003, and today it has millions of users worldwide. The software was originally created to publish blogs, although over the years it has been used to power all sorts of websites, from e-commerce applications to photo galleries and community driven websites.
Notice that the WordPress software and official website can be found at WordPress.org, while WordPress.com is the free blog hosting service provided by Automattic, the company that created WordPress.
Why Should You Use WordPress?
We highly recommend anyone to use WordPress as his content management system. The only situation where WordPress would not be adequate is for people who want to create a very specific type of website (e.g., a wiki, an online forum or a social bookmarking site).
Here are the five main reasons to use WordPress:
Open Source. Open source software means two things: first of all it is free for any sort of use. You can use it to power your personal blog or power your corporate website. Secondly, it will remain free forever. No company owns the code. The community does. This is important to make sure that you will not risk losing the control over the software that powers your websites.
State-of-the-art platform. WordPress is arguably the most reliable and sophisticated publishing platform available on the web. It has a wide range of basic and advanced features, and since it uses the PHP language, anyone can edit and tweak the core code to create new uses and features. Moreover, WordPress makes it very easy to manage any site, and it already comes with some search engine optimization.
Active Community. Another big benefit of using WordPress is the support that you will have from its active community. The WordPress support forums are always full of members ready to help fellow WordPress users and to explain how you can solve your technical problems. On top of that, you will also find a wide range of websites and blogs that are exclusively dedicated to WordPress and its development.
Themes. WordPress uses themes, which are nothing more than web templates that can be installed and switched between with a single click. There are thousands of freely available WordPress themes, and there are also many companies that produce premium quality WordPress themes that you can purchase and install on your blog.
Plugins. WordPress already comes with a large number of features out of the box, and you also have thousands of plugins, most developed by the users themselves, that can be installed and that will carry out all sorts of tasks.
WordPress Installation
Before installing WordPress, you need to make sure that your hosting plan supports PHP (version 4.3 or greater) and MySQL (version 4.0 or greater). If you followed our advice in the “How to Choose a Web Hosting Company” lesson, though, you should be fine, as virtually all Linux based web hosting plans also support PHP and MySQL.
Now there are basically two ways to install WordPress on a server. The first and easiest one is via a script that is present in HostGator hosting plan, called QuickInstall. In order to access the QuickInstall script you first need to log into your cPanel. Watch below video for clear instructions.
The second way to install WordPress involves the manual download of the files and is slightly more complicated. WordPress.org has a manual for this installation, and we will also be doing a video demonstrating how you can do it in your own website.
Basic Setup
After the WordPress installation is complete, you should be able to see the default WordPress theme and a sample post on your site. Now you want to log into the WordPress control panel to setup the basic settings. You can access the control by cPanel by typing your domain followed by /wp-admin/ (don’t forget to include the blog sub-directory if you are using one). For example:
http://www.domain.com/wp-admin/
or
http://www.domain.com/blog/wp-admin/
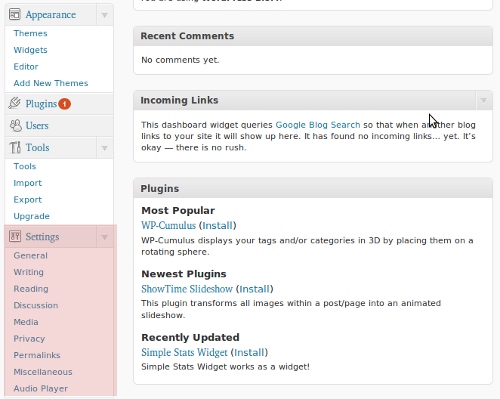
Type your user id and password, and then you will be redirected to the Dashboard of the control panel. That is the place where you can get a quick glimpse of all that is going on inside your blog. At the bottom of the left menu you will find a tab called “Settings.” Expand it and you will find several links inside it, including “General,” “Writing,” “Reading”and so on.
First of all, click on “General.” Write the title of your site and the tagline if it has one. Then make sure that your “WordPress address (URL)” and “Blog address (URL)” contain the www. prefix in front of the domain. If they don’t, add it. In theory, you could leave those addresses without the www., but most people are used to adding the www. when they link to other sites, so having the standard URL for your site is preferred.
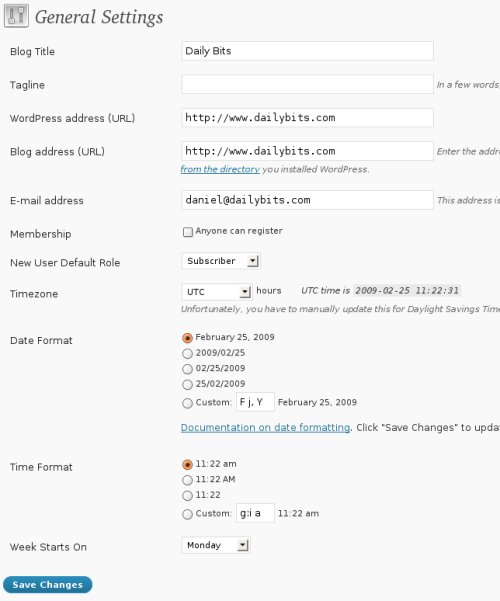
Below those fields you will need to insert the email address that will be used to receive communications about the blog.
The other options regard the time zone that you want the blog to be in, and the display format of the dates in posts and pages of the blog. Once all is set, click on “Save Changes.”
Now click on “Writing.” Here you will be able to decide the size of the text editor (used to write your blog posts), as well as formatting options and default category. If you want to be able to post to your blog via email you can configure it below, but most people don’t use that feature.
Next click on “Reading.” This section has some important options. The first one is about the content of your homepage. If you are building a normal blog, leave the latest posts to be displayed. If you are building an online store or a mini website, though, you might wanna choose a static page to be used as the homepage.
Below that you can select how many posts should be displayed on your blog pages, how many posts should be displayed in your RSS feed, and the posts in your feed should be displayed in full or partially. We recommend leave 10 posts on the RSS feed and letting them display in full. This will increase the number of RSS subscribers that you will get, as most people don’t like partial feeds.
Next, click on “Discussion.” You can leave the “Default article settings” as they are. Then choose the options that you want for your comment section, and when you should get notifications via email. Finally, configure how Avatars should be displayed.
You can skip the “Media” and “Privacy” tabs for now, so click on “Permalinks.” This is a very important step to make sure that the permalink structure of your posts and pages will be optimized for search engines. We will explain this in greater detail under the SEO module, but an optimal permalink structure is one that contains the main keywords of the page in question.
The default permalink structure in WordPress is the following:
http://www.yourdomain.com/?p=123
As you can see, the posts and pages are represented by numbers under that structure. Instead of numbers, we want to display the title of each post, so that the permalink would look like this:
http://www.yourdomain.com/post-title/
You achieve that by selecting the “Custom Structure” option and then inserting /%postname%/ on the input field. Click on “Save Changes.”
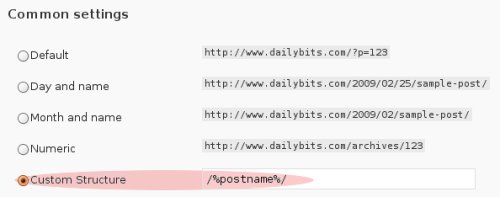
If see the message “You should update your .htaccess now,” it means that your .htaccess file is not writable.
To solve this problem you can either make the .htaccess file writable with an FTP client (by changing its permission to 777) and then click on “Save Changes” again, or you can directly copy and paste the code that will be presented at the bottom of that screen inside your .htaccess file (the one at the root of your server).
Changing Your Theme
Let’s now cover some of the basic features that you will be using inside WordPress. The first thing that you might want to do is to change your theme and customize it.
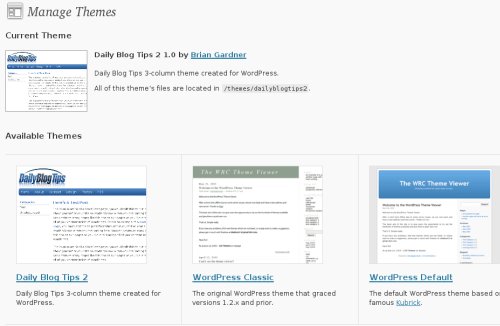
If you click on “Appearance,” on the left menu, you will be able to see the current theme of your site and all the themes that are already uploaded in your server, and therefore, available.
You can find new themes at WordPress.org/themes. After you find one that you like, you just need to download it, unzip the file, and upload the complete folder to your website.
When uploading the themes remember that the right path for the WordPress themes is:
http://www.yourdomain.com/wp-content/themes/theme-name/
Once you have uploaded the theme you just need to refresh the “Appearance” page, and the theme will be displayed there. Now you need to click on the theme and activate it by clicking on a link that will appear on the top right corner of the preview screen.
Most modern themes support widgets, which is a way to change layout elements of your design with one click, without the need to edit any HTML or PHP files. If your theme supports them, you just need to click on “Widgets” under the “Appearance” menu and enable the specific ones that you need.
If you want to edit your theme layout beyond the widgets, you can click on “Editor.” That page contains links to all your theme files, and you can edit them at will. Make sure to back-up the individual files before changing them, though.
Action Points
- If you have not already, install WordPress in your website using QuickInstall or with the manual installation.
- Go through the basic setup described in the lesson and configure your WordPress blog.
- Download a new theme from WordPress.org and activate it. Try also to play with the widgets and with the theme editor.
Navigation Links
Previous Lesson: How to Choose a Web Hosting Company
Next Lesson: WordPress Resources and Plugins