

PPC or Pay-per-click is an online advertising model where advertisers pay whenever a user clicks on their ads. A company called Goto.com developed the idea in 1998, and it spread all over the Internet since then.
The model itself can be used with any type of website. Social networks like Facebook and MySpace, in fact, have recently launched their own PPC platforms where advertisers can display text-based ads to their visitors and pay only for clicks.
Traditionally, however, the PPC model is used for advertising inside search engines, making it possible for advertisers to bid on specific keywords.
The largest PPC network on the Internet is the Google AdWords program, and in this lesson, we will explain how it works and how you can get started with it. Chances are you will only need to work with Google AdWords for your PPC campaigns, but even if you decide to experiment with smaller networks, the principles listed below will still be valid.
The Advantages of PPC
As we mentioned before, the PPC concept was created in 1998, and over the years it evolved to become one of the most popular online advertising models. There are two main reasons behind this success. The first one is the fact that PPC allows companies and individuals to advertise only to people who are actively looking for their products or services.
It is true that with other online advertising models you can also target specific audiences, but the PPC model takes such targeting to the extreme. When you purchase banners or CPM ads, for example, you need to select websites in a certain niche, hoping that their visitors will have an interest in your product. With PPC advertising, on the other hand, you are able to select very specific search queries to trigger your ads, and they will be displayed only to people using those queries in search engines.
The second reason is the fact that advertisers only pay when a visitor actually clicks on the ad. In other words, they just pay when customers react to the message that the advertiser crafted. As you can imagine, this can drastically improve the effectiveness of advertising campaigns. With CPM ads, for example, an advertiser could spend thousands of dollars only to find out a couple of weeks later that the ad was not working and no one was clicking on it.
Understanding Google AdWords
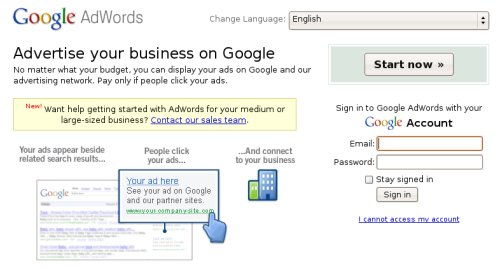
In order to understand how Google Adwords works, let’s suppose that you have a web hosting company and that you want to use the program to advertise your services. First of all, you need to head to adwords.google.com, and sign-up for an account.
You will need a credit card, and there is a nominal activation fee of $5. The purpose of this fee is to limit the usage of fraudulent credit cards.
Once your account is active, you will be able to create a new campaign. On the first screen you will be able to choose the general settings of your campaign, as this image illustrates:

The first step here is to name your campaign. After that, you will need to choose the audience that you want to target with your ads. You can select the whole world, specific continents, countries, and even cities. Secondly, and you can also choose the language that your prospects should speak.
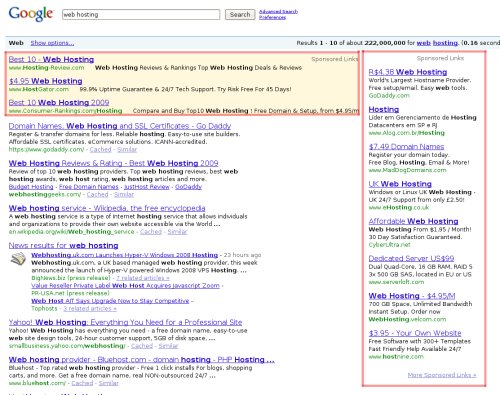
The third step is the selection of networks and devices. There are two main networks inside the Google Adwords program: the search network and the content network. When you choose the search network, your ads will be displayed inside Google’s search results (and possibly on the search results of Google’s search partners). Currently, only text ads are supported with the search network, and they are displayed above and to the side of the organic results, as you can see in this screenshot:
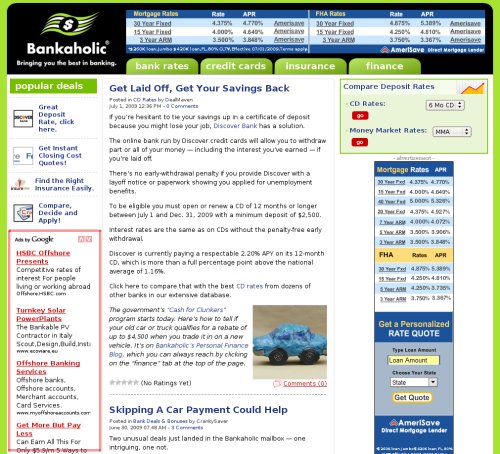
When you choose the content network, your ads will be displayed on websites that have partnered with Google via the AdSense program. The content network supports text, image and video ads. Here is a screenshot of a website displaying ads from Adwords advertisers:
The “Devices” feature allows you to target computers and/or mobile devices.
The final step on this first screen is to choose whether you want to place bids manually or automatically, and what will be your daily budget for the campaign.
Upon clicking on “Save and continue” you will be transferred to the “Ad Groups” creation page. Each Google AdWords account can have up to 25 campaigns inside it, and each campaign can have up to 100 ad groups inside it.
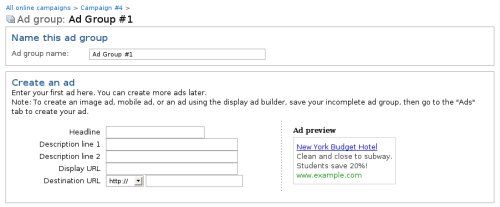
The standard ad has five main elements:
- the headline,
- the first description line,
- the second description line,
- the display URL,
- and the destination URL.
Google has some guidelines for the usage of the display and destination URLs. The two main points are that you can’t use a redirect as destination URL and that the display URL must reflect the domain of the landing page for the ad. You can read all the guidelines here.
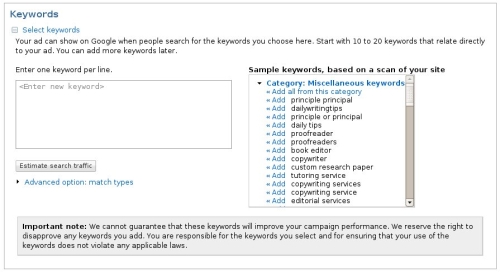
The second step here is to select the keywords that you want to target with this ad group. At this point, you should just write down 10 or 20 keywords related to your products or services, and later on, you will be able to use the Google Adwords Keyword Tool to add more keywords and optimize the list. On the right side, you will also see some keyword suggestions based on the content of your site.
The final step is to specify your bid for the keywords. This is the highest amount of money that you are willing to pay for a single click. If you will display your ads both on the search and on the content network, you can set a separate bid for each of them. The minimum bid is $0.01.
Once you click on “Save Ad Group” your ad will be saved, and within some time it will be active. Provided that your bids and quality score are high enough, your ads will start appearing either on the search or on the content network, and the clicks will start coming.
Google AdWords has two payment options: prepay and postpay. Depending on your country, both or only one of them will be available to you. Once you choose one you can’t switch back, so think twice before making your decision.
The Quality Score
The Quality Score is one of the most important factors inside Google AdWords. Why? Because it will affect both how much you will end up paying per click and the position of your ads. In other words, the higher your Quality Score, the higher the traffic that you will be able to buy for the same amount of money.
Basically, each keyword inside your ad groups will have its own Quality Score. Once a search query is performed in Google, the AdWords system will gather all the advertisers who are bidding on that keyword, and it will use both the bid amount and the Quality Score of each keyword in the ad groups of those advertisers to determine what ads will be displayed, and in what order.
Google uses two different algorithms to calculate the Quality Score: one for the search network, and one for the content network.
For the search network, these are the factors that are taken into consideration to calculate the Quality Score:
- the historical CTR (Click-through rate) of the keyword and the respective ad,
- the average CTR of all the ads in the Adwords account,
- the quality of the landing page for the ad,
- the relevance of the keywords to the content of the ad,
- other relevance factors.
For the content network, these are the factors that are taken in consideration to calculate the Quality Score:
- the historical performance of the ad on similar websites,
- the relevance of the ads to the content of the website,
- the quality of the landing page for the ad,
- other relevance factors.
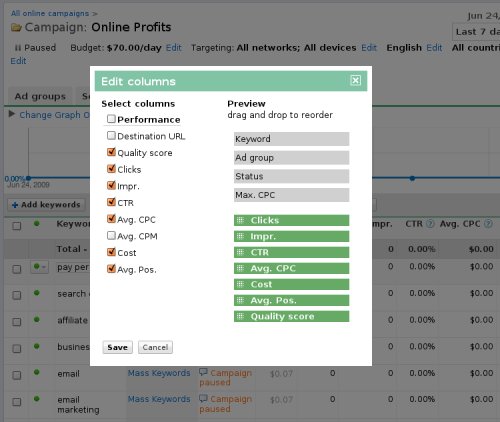
Google does not reveal the real Quality Score of your keywords, but it gives you indicators. Inside the ad groups screen you can click on “Filter and views”, and then on “Customize columns.” A popup will open with a wide range of columns that you can show or hide, including the one for the Quality Score.
Alternatively, you can also hover the mouse over the “Status” column of your keywords.
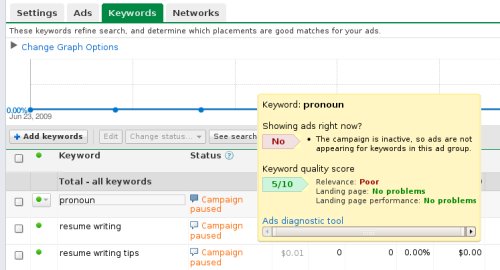
This will open another popup with information about the Quality Score, including a breakdown for “Relevance”, “Landing Page” and “Landing Page Performance”.
Google Adwords Tools
Google Adwords comes with a very useful selection of tools. Currently, they have eight tools to help you optimize your ads and five tools to help you analyze the performance of your ads.
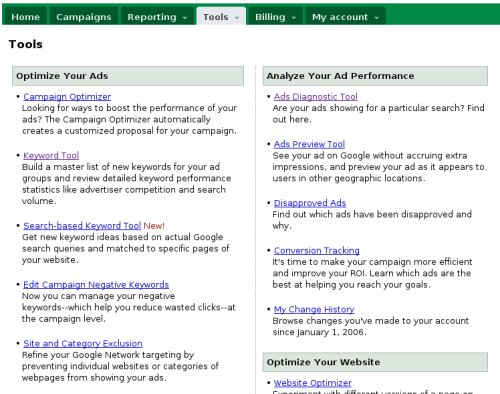
The first tool that you need to become familiar with is the Keyword Tool. This is the same tool that we cover under the “Keyword Research” module, but when you use it with the internal Adwords interface you are able to save your list of keywords directly to specific campaigns and ad groups.
Another very useful tool is the Ads Diagnostic one. It basically allows you to simulate a search query (including the keyword, google domain and geographic region) to see whether your ads are being displayed or not. Once you run the tool you will see a list with all your ads that were targeting that keyword, and if they are not being displayed you will be presented with the reason.
You will also find tools to estimate the traffic that your ads will bring, to manage your negative words, to block IP addresses and so on.
Action Points
- Sign-up for a Google AdWords account.
- Create a sample campaign to get yourself familiarized with the interface.
- Explore the internal tools that are available to Adwords advertisers.
Navigation Links
Previous Lesson: Email Powered Affiliate Marketing
Next Lesson: PPC Optimization